Thursday, November 01, 2007

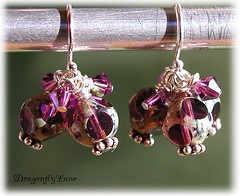
Eggplant clusters

Or maybe dinosaur egg clusters. I'm not sure. Neither name sounds very glamorous. LOL! Here are the earrings anyway:
New earrings for ME!
I bought the window beads in a bead store in Eureka, CA about 3 years ago. And I just used them today! I hardly ever buy beads in a bead store. Bead stores are just not...economical. I am frugal and like to buy my beads in bulk.

I love cluster earrings. I made a few pair of cluster earrings, a few years ago, before I had ever seen them on the internet. Which makes me feel good. Lately I have serious issues with "originality" and "oh crap...that looks like someone else's design". So me coming up with an original cute idea, way back then, makes me smile today. Nowadays cluster earrings are all over Etsy. Have you noticed? ANYWAY...it dawned on me that my unused bead store beads would make cool clusters.

I spent some time playing around with photographing in the new craft room. The windows are all south and west light. I took late afternoon pics. I experimented with direct light on the earrings. They were SO pretty sparkling in the light. It's sad I couldn't capture that in picture. But I'll keep experimenting. I didn't use my lightbox. And I didn't even adjust the picture color afterwards! I just cropped and sharpened. It's not a stellar picture...but it's not bad for a first pic in the new room.

Anyway (how many times have I said that word??), I'm wearing my new earrings right now and I love them. It's the first jewelry I've made for myself in a long time. I think I'll do it again....soon. :)

Saturday, September 15, 2007

I Highly Recommend..

I am a self taught crafter. I use books and online tutorials. I live in the middle of no-where and do not have access to lots of workshops and classes. I am not financially able to travel to locations where classes ARE available. So I have been buying how-to books for over 10 years. This means I have bought the good, the bad, and the ugly. :)
I want to share the GOOD books with you and save you the trouble of trial & error shopping. These are my must-haves...my absolute favorites. I looove these books!
If you buy one of these books from Amazon.com I will get a small commission. Just FYI. So thank you, in advance if you make a purchase through one of these links.

I have 2 books that tie for my absolute favorite polymer clay books. This is one of them. The title says it all...this book is FUN. All the projects are beautifully done but also funky and clever. Clear instructions with lots of pictures. Kim takes the 'ordinary' techniques and turns them into extraordinary projects for any skill level.


This is the other book that ties for favorite. It should be named The Polymer Clay Bible. Judy put together a masterpiece that blends beautiful pictures with a wealth of historical and instructional information. You can spend hours looking at all the contributing artists' "eye candy". Or you can spend days reading and absorbing not only the artistic background of polymer clay, but following the easy-to-understand project lessons.


I had never bent a single wire before I bought this book. I was scared to make even the simplest looped eyepin for earrings. Mark takes you through every single step from the very beginning. He starts by explaining the wire and tools clearly, and shows you clear photos (of the right and wrong) every step of the way. I can not praise this book enough. If you want to learn basic to intermediate wire working, buy this book!


Like the book above, I can not recommend this book enough to aspiring seed beaders. No joke, everything you need to know is in this book. Carol gives large, clear diagrams of all the seed beading stitches and patterns. There is plenty of fabulous eye candy to inspire you as well.

Friday, September 14, 2007

Saying thanks

I have always liked to send some sort of thank you gift with purchases. The gift always varies depending on the person and the situation. The gift usually coordinates with the purchase or is a few extra of what they purchased. But more times than not I don't have extras. So I've been playing around with the idea of a standard thank you gift have on hand. And I came up with this:


They're magnets! They are 1 inch square. They are really just simpler versions of my flower art bead pendants. The petals are solid colors instead of cane slices. The centers are beautiful, tiny vintage rhinestones from my extremely talented pal Scott. (Psst! Look here for more sparklies.) The words are an image transfer using tshirt transfer paper. As you can see from the picture of the back side, my transfers are not always perfectly straight across. LOL!

I've already mailed out a few of these in different colors. Personally...I love them! But then, I adore the flower pendants I make as well. I'm biased. :) Anyway, I'm super pleased that I now have a handmade thank you gift to send to each customer. It makes me smile.

How do you feel about thank you extras? Do you send something with your packages? Do you expect a little something extra as a buyer?

OT personal note: Monday we were told we might close on the house today (Friday). But there have been a few typical closing snags. (Snags with our house?!? No way!!) Today the word is we'll close by Wednesday. We're almost there! Wheee!!

Thursday, September 06, 2007

Last of the skulls and a new video

Happy Thursday to you. :)

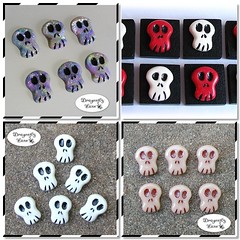
I have uploaded the last of my little skull beads at Etsy.

Because of the move, there will be no more before Halloween. Which totally kills a whole list of color scheme ideas I had! So please go check them out if you are in the want or need for adorable little handmade skull beads. :)

Also, I've uploaded a new clay video. This one covers the how-to of making shiny polymer clay beads. I demonstrate wet sanding, buffing, and applying Future as a clear finish.
I originally planned to upload the video to both Live Video and YouTube, but only promoting the Live Video one b/c I really prefer that website. But wouldn't you know it....Live Video is doing site upgrades right now and my video is stuck in the que. But the YouTube version is fully functional. LOL! Irony! :)
Anyway, here are the two links: On YouTube - Live Video.

And on a personal note: We are in the home stretch of the house closing process. We will get an official date any day now. Yay!! Now....I'm off to pack some boxes! :)

Edited to add: The Live Video version is live now. The link above will take you there.
Also, only 2 of those 4 sets of skulls are still available. That's leaves 4 sets total. So pop on over there if you like. :)

Friday, August 24, 2007

Adding new content

I managed to get a 3 column layout going here. I've never been super keen on the 3 column look, but now that I'm going to use this blog as my main communication webpage I have to adjust. :)

I added a link to my clay tutorials and transferred all the links from my "favorite links" page at Dragonflylane.com over to the right column there. --->

I also have a page of recommended books I'd like to move here, but I'm not sure it's sidebar content. Maybe an individual post that I can then link to in the sidebar?

Anyway, please let me know if you click on anything that doesn't work. I found a nifty online tool that allowed me to create this layout and all the colors. I'm planning to tweak it with some graphics too. But this will do for now.

The sun has finally popped out today (been cloudy and rainy...YAY!!!). I need to get outside and take pics of some new skull beads while I can. Toodles!

Friday, August 17, 2007

Faux ceramic

Have you read Michael's faux ceramic tutorial? It is very very fun stuff. I am enjoying experimenting with all the color possibilities. This is only a tiny part of my experiments.

These are cute little beads that I plan on making more of.

All but one were made with pre-tinted TLS. I *think* they were tinted with oil paints but honestly I'm not sure. I bought them from another clayer some time ago. But I like the way they feel and look. The darker purple one (about 3 o'clock) I made with TLS tinted with metallic alcohol inks. The liquid clay is gorgeous, but I'm not crazy about it on this beige clay. Even with several layers of Future, it's still sort of grainy. Don't like that so much. I'm going to try the purple liquid clay on some different base colors. I'm thinking turquoise, pink, white, maybe silver? What do you think?

And I loooove this pendant. I've listed it in my Etsy store, but I'm not totally convinced I want to part with it! I wonder if I should take pictures of it on the usual white background? Hhmmm...


Anyway, this is what I've been playing with. In between skull beads that is. :)
1st round of skull beads

Tuesday, August 14, 2007

I got an award!

The very pretty Melissa of Bully Beads gave me an award! Wheee!! Thanks Melissa!


Check out her Etsy Shop. Lissa makes gooorgeous jewelry!

Friday, August 10, 2007

God bless the parents who drugged us.

As seen on Laura's blog. I think this little story is great! Aaron and I are firm believers that there is far too much Ritalin and time-outs nowadays. People always say to us "Your children are so well behaved. How do you do it?" Answer: We raise and discipline them like we (and our parents) were raised. Anyway...before I get on a soapbox, check this out:

The other day, someone at a store in our town read that a Methamphetamine lab had been found in an old farmhouse in the adjoining county and he asked me a rhetorical question.

“Why didn’t we have a drug problem when you and I were growing up?”

I replied I had a drug problem when I was young: I was drug to church on Sunday morning. I was drug to church for weddings and funerals. I was drug to family reunions and community socials no matter the weather.

I was drug by my ears when I was disrespectful to adults. I was also drug to the woodshed when I disobeyed my parents, told a lie, brought home a bad report card, did not speak with respect, spoke ill of the teacher or the preacher, or if I didn’t put forth my best effort in everything that was asked of me.

I was drug to the kitchen sink to have my mouth washed out with soap if I uttered a profanity.

I was drug out to pull weeds in mom’s garden and flowerbeds and cocklebur’s out of dad’s fields.

I was drug to the homes of family, friends and neighbors to help out some poor soul who had no one to mow the yard, repair the clothesline, or chop some firewood; and, if my mother had ever known that I took a single dime as a tip for this kindness, she would have drug me back to the woodshed.

Those drugs are still in my veins and they affect my behavior in everything I do, say, or think. They are stronger than cocaine, crack, or heroin; and, if today’s children had this kind of drug problem, America would be a better place.

God bless the parents who drugged us.

Thursday, August 02, 2007

Silver and clay belong together!

At least in my humble opinion they do. :) I am so excited that I now have my beginner metal smithing supplies. In the next month or two (sooner if I make some Etsy sales!) I'm going to add a jeweler's saw and some metal sheeting to my box of toys. Right now I'm working with wire and premade bezels. I'm practicing my soldering. It's getting better. Which merely means I suck a little less than last week. LOL!

Anyway, I sketched an idea and created it this week! The soldering even went well. I polished it and added come clay. YAY!!


The leaves dangle and move slightly inside their delicate frames. FUN! :)
I held several different styles of beads inside the frames. I foresee several versions of this one.

It looked better in my head

How many times do you say that after you create something? Oh man...I say it A LOT.

I have been wanting to make some flowers with skulls as the centers. In my head it was so cute and odd and whimsical. But this first version of the idea is 'ok' but not perfect.


Structurally the pendant is fine. But I'm not 100% pleased with the way it turned out. I think, maybe, the skull needs to be nestled into the petals instead of resting on top.

However! I do like how it kind of has that pirate's medallion look about it. The flower petals almost look like a compass to me. And the tiny swarovski rhinestones (Thank you my generous friend Scott!!) really sparkle in that fiery blood stone sort of way. :) Oh!! And the extra long headpin was made my ME. I finally found something I can do successfully with my torch. LOL!

Last nite I got to thinking....I may not be 100% happy with the pendant, but someone else might think it's perfect! We are all drawn to different styles and have different tastes.
What should I do with it? I was thinking about opening a discussion at the Etsy forums....asking others to share pictures of their "Not quite perfect" creations. And maybe, just maybe, potential buyers will fall in love with those creations and want to give them a good home. Because I think we all create things that are structurally and functionally good...they just don't appeal to the creator aesthetically. Kind of like when I'm sitting at a red light and say, "I'd drive that car if it were a different color!" But the car's owner loves the color. Am I making any sense at all? I don't feel like I am.

I guess I'm wondering: Should you only sale the pieces you yourself feel are aesthetically perfect? Do you withhold the not quite (aesthetically) perfect pieces? (Even if they are otherwise perfect in your opinion.)

Thursday, July 26, 2007

New art bead pendant

Check out this new fiery little number:
Fiery flower art bead pendant
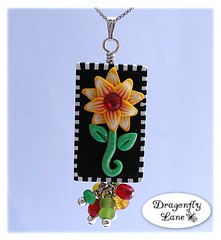
I've listed it in my Etsy shop. :) I really enjoy making these little art bead pendants. The teeny tiny slices of petal cane are tedious to work with, but that's ok. The finished look is worth it!
This time I made a bead cluster for the bottom accent. Isn't it cute?! Even Aaron said "I like that! That's really cute!" Coming from a man I take that as quite the compliment. LOL!

I want to find some new sterling bails to use on my pendants. The ones I have (like pictured above) are too small. So far I can't find the perfect size. I want bigger, but not too thick and gaudy. Do you buy bails online? Care to share sources? :)

Thursday, June 21, 2007

Faux stone experiments

I recently snagged a new book (Making Polymer Clay Beads by Carol Blackburn) that has a project for making faux marble. It's certainly not the first time I've seen this technique....but it's the first time I've tried it.

I seem to be incapable of following the color recommendations for a tutorial. ANY tutorial. It's like a mental block. HA! The book called for white, translucent, and black. But I've been experimenting with other colors. My very first experiment beads turned out so cool. Unfortunately, I can't get a good picture of them. They are these earthy green, copper-ish jasper like beads. Hopefully I'll get a picture to share soon.

For now, I want to show you the others! I used gold mica powders for these.
Faux stone experiments
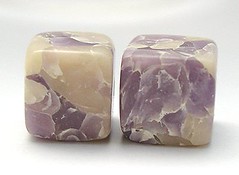
My very first reaction to them...after they were freshly sanded: "Hey honey! Want to see what happens when a can of cream corn and a block of marble have a baby??" LOL! Aaron and I refer to them as 'the cream corn beads'. But after I finished all the different grits of sanding and buffing...I love them. In real life, the mica powders are gorgeous. The layers seem to move in the sunlight....they are gorgeous.

These little guys are cute.
Faux stone experiments
They did not turn out as vivid as I had hoped...but I still like them. A good jewelry designer could pair them with other beads that make them pop, I think. I have more that are waiting for buffing.

And these poor little fuglies...
Faux stone experiments
Did NOT turn out like I had hoped. I have too many of these little guys. LOL! I'm sure in the right piece of jewelry they would be adorable. But I just don't have the imagination to make that happen.

I have many more colors of mica powders to experiment with! I'm sure you'll see more of these in the future. :)
Btw...click on any picture to visit my flickr album and see more. If you want to. :)

Monday, June 11, 2007

Leaf cane

Saturday I got the privledge to teach a cane lesson at our guild meeting. I get all nervous and fumble around with the lesson. I mumble to myself and change my mind half way thru the lesson. I'm a real pro! HA! Not. I'm lucky to have kind guild members who don't seem to mind too much. :) Anyway...we had a great time.

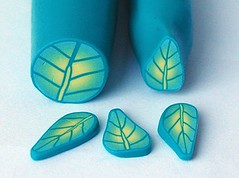
I was worried about the reducing process. To me, reducing is the hardest part. You can really screw things up with bad reducing. LOL! Sometimes it takes lots of practice to get the hang of reducing without lots of distortion. But apparently, our guild is full of natural born reducers! :) We had 6 out of 6 perfectly reduced canes. It was very cool. Here's mine.
Leaf cane from guild meeting

I hope everyone shares their own cane pictures on our group flickr page. Penni Jo has already posted one. She took her leaf cane, added a Donna Kato style petal cane and made beautiful flowers!

What should I do with my caribbean vaca leaves? (That's what the colors make me think of. LOL!) Maybe a new set of summery jewelry for me? Maybe a caribbean color tree art picture?

Friday, June 08, 2007

Sloooow Etsy?

Is Etsy loading painfully slow for you? It's been getting slower and slower, for me, for days now. At first it was just the search feature but now it's the whole site. Slow slow slow!!!
The rest of the internet works fine for me. I just ran AdAware because I thought maybe spyware was bogging me down. But Etsy is still dragging. I can not get ANY pages to load.
Am I the only one? I wanted to just surf and window shop today. WAH!!!!

Thursday, June 07, 2007

Silver Leaf Jewelry

If you are interested in using metal leaf with polymer clay, you might check out the new video tutorial I uploaded.

It demonstrates some very basic techniques that you can build on and turn into your own style! I hope you enjoy it. :)

Swap activities

I recently joined a clay bead swap group. I even signed up for two swaps. Which is sad because my own swap group hasn't swapped in over a year. *hangs head in shame*

One swap is for rainbow bead sets. I loooove rainbow themed anything. I really enjoyed making these.

The little white flower petals have irridescent white glitter on them. Which turned out looking more like texture than glitter. SO..I added pearl mica powder also. I still wasn't 100% happy with them, but they are still cute.
There's not much story behind the tire shaped beads. I wanted basic B&W spiral beads...but didn't want the typical round shape. So they got a light squish. :)

I also signed up for a MG pendant swap. I planned ahead and made an extra set of rainbow beads, just in case. But I didn't make extra pendants. Two more people have signed up since I made these.

I don't know if I should make a different style or keep going with more of these. These are not terribly time consuming...just wire consuming. :) But aren't they cool?! I'm going to make one for myself eventually.

Wednesday, May 16, 2007

Revisiting an old idea

Shield your eyes! I'm warning you. Fuglies ahead:

These are some of my very first beads from 2000. The long skinny pendant on the left was an idea that came to life way back then. I still have the pendant hanging on my clay table. I liked it (the basic idea) 7 years ago, and I still like it today. The old one was made with a beginner cane, some old scrap silver colored wire, and a couple seed beads.

Here is the same idea with mokume gane slices, nice sterling wire and two teeny tiny swarovski crystals.

I made the mokume gane block thinking of ocean colors. The pendant shaped itself. It started rectangular and grew from there.

I jumped on the Etsy bandwagon and opened a shop. I'm going to use it to sell my loose pendants and beads. I'm still fumbling around the system a bit....trying to get used to picture settings and such. But I like it. Seems much cozier than Ebay.

Saturday, April 21, 2007

My photo box setup

During Claypen chat last Thursday, we talked a bit about taking better photos of our clay creations. I wanted to share my own low-tech setup.

First I take a drawer out of the rubbermaid rolly cart.

I have tried many different lighting setups. Right now I choose to use natural sunlight. Lots of indirect sunlight if possible.
If I absolutely have to take a picture after sunset, I put lots of lamps around the sides and top of the drawer.
I also tweak the settings on my digital camera. I am SO not a digicam guru. I don't even know what the settings mean...but I have found what works for me is:
Changing the 0.0 setting to +0.7. It lightens the picture a bit. I use macro mode (looks like a little tulip flower icon). I also use my cheapo little tripod. (Less than $10 at Walmart) ANY movement while using macro mode makes for blurry pics.

I use white printer paper as the background inside the drawer:
It's normally sitting on a table next to a window.
Even my best pics need tweaking afterwards with a program. I use PhotoImpact, but there are many others. I made a little tutorial to demonstrate cropping out background. Sadly I've never finished it to include color tweaking. I'm sure you can Blingo tutes for your specific program.

You can also use free online photo editors. No need to go buy a program. I have not searched extensively...but here's a few to get you started.

Here is a before/after of an edited photo.

Now clearly I'm not an expert at it all. But I've seen worse. :)

Monday, March 12, 2007

The VERY belated bday bracelet

Mom's bday was Feb. 6th. I had the great idea to make her a bracelet using gold mica shift beads. She wears yellow gold and some sterling...so I thought gold clay would be great for her daily wardrobe.

Oh wait! Let me back up a bit more. I recently experimented with mica shift tile beads and came up with this bracelet for myself:
New bracelet for me!
It was one of those morphed ideas that turned into my most favorite thing I've ever made. Since they were my first tile beads, the thickness was an experiment. They were almost too thin. Drilling was tricky so as not to crack the beads. And I could not afford to ruin any beads drilling...not when it takes an hour to make each bead (and clay time is in short supply for me)!
ANYWAY...point is: I judge all new beads against these for the cuteness factor. But wanted future beads to be a little thicker.

Now back to Mom's bracelet. I made very pretty gold beads and decided to add turquoise as the accent color.
Gift for Mom
I did not love it. So I asked my friend as PCC
for help. They suggested black crystal rondelles. So I ordered some. In the meantime I found these beautiful 6mm cathedral beads and gave them a chance:
Experiment beads
Didn't like it either. So finally the black crystals arrive. The picture does not do them justice...they are simply elegant.
And finally with the black rondelles
But I STILL don't like it! Not to mention...the bracelet is an INCH TOO SHORT. Aaron bought me a new baby bench grinder. I was using it to polish the gold beads this past week. I lost control of one bead and, well...you know what happened. PING! VROOM! BAM!! The screaming astroid bead got damaged during re-entry. Damn it.

Yes, I could make one.more.bead. But I'm not gonna. I'm sick and damn tired of these gold beads! I've decided the problem is the thickness. They are too chunky. Too chunky for an elegant, glistening, swirly design. Do you know WHY I know this??

Because I made another set just like them, only in beautiful baby blue. They are so pretty. I mixed the color specifically to go with these cool tortoise shell glass window beads. Brown and baby blue...very cool color combo. Right?!? Wrong! Not when the pretty blue beads are TOO DAMN CHUNKY!! See:
Another "not quite right" bracelet
I am so design challenged. It's driving me nuts. I'm getting rid of these two sets of beads. The beads are great! I know they can make beautiful jewelry in the hands of someone with imagination. And it ain't me! I'm going back to the drawing board. I'm going to find the perfect thickness. Thick enough for easy drilling....not too thick to look chunky.

Whew. I feel better now that I've spewed and rambled on about this very un-important topic!
(p.s. click any of the pics for a larger image)

Back in the saddle

I started this blog to host a weekly recipe swap. That idea flopped, floundered and died. But oh well. No biggie. It was not my first bad idea...won't be the last. :)

I had also used this blog to talk about my clay work. Almost every item I make has a story behind it. Not always interesting stories...but stories nonetheless. Personally, I find it fascinating how the stream of conciousness idea works. Ideas and thoughts sprout new ideas, and they morph into new ideas, and maybe because of special circumstances they change again, and so on. This is how most of my clay things come to life. In my sketch book they start out completely different. Perhaps the journey to the finished products will only be interesting to me. But again...no biggie. That's why I love journaling. Looking back and reading about what once was and how it came to be.

With that in mind...I'm going to go crop/edit/and upload a couple new pictures. I'm frustrated with a current idea and I need to talk about it. :)

Wednesday, June 21, 2006

Mica shift magnets

I've only tried mica shift once before. The results were not impressive. Totally my fault for skimming directions. That was well over a year ago.

Last week I got the wild hair to try again. I have Kato clay now and have read many times how wonderful Kato is for mica shift. I mixed up a pale blue color and got out one of my favorite swirly stamps. I loved it instantly! I kept making my husband rub his fingers over the raw clay...."Feel how smooth it is?!? How cool is that?!?" LOL!

The next day I sat down to play. NO prior plans or expectations. I was merely 'piddling'. I got out the wavey blade. I trimmed the blue sheet a bit. Then I decided to put a black & white border around it....contrasting the pastel blue....it might look cool. (I just love the funky striped border effect!) Then I envisioned beaded dangles from the wavey edge. And it clicked: magnets!!

So I started mixing coordinating pastel colors. I suddenly had a plan. *insert evil giggle* A whole set of bejewelled, shiny, funky fridge magnets. Ooooh yeah!!

This is what I got.
Mica shift beaded magnets
(click for bigger pic)
I call it jewelry for the fridge. I love love love the way they look on the fridge. I will definately be making more fridge jewelry in the future!

Sunday, June 04, 2006

Clay on canvas

I had an idea for a wall hanging for my daughter's room. I painted a canvas pink, added glitter, and then created clay flowers and a dragonfly. I really like the way it turned out.

Clay on canvas

It still needs something. I can't decide what. Originally I planned on a black & white stripe clay border....along the outer edge. I've sinced changed my mind. I may paint some white clouds. I also thought about a swirly stamp along the edges. But I just can't decide.

This was my "prototype". I have several ideas for similar wall hangings. I love building flower canes, but hate having to choose a color for the outer/negative space. This canvas idea is great for me. I can make oodles of petal canes and not have to commit to background color. Plus I like the 3D look. They don't have to be flat like cane slices.

Oh...the dragonfly! Was my first TLS experiment. What FUN that stuff is!! I bought a bunch of pre-colored TLS from a fellow clayer. I've been playing around with the colors making sets of wings. Fun fun fun!!

Now I need to hit the craft store for more canvas. Wheeeee!!

Thursday, May 04, 2006

Flowers and a bear

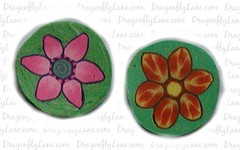
Here are 2 new flower canes I've made:
Flower canes April 06_reduced
The pink flower came first. It's my favorite! I love how it turned out. From start to finish it just worked. :)
The orange flower went thru several incarnations during the building process. I started w/the idea of a simple sunflower-esque cane. But I did not really like the colors after I built the petal cane. So I tried reducing it and changing the look. I had to make the petals really small. I didn't start with a large enough skinner blend....a problem when changing plans. Long story short: I was unhappy with it from the start. It seemed to get uglier with each incarnation! LOL! But I finished it and reduced it. I was shocked when I cut into the cane. It turned out quite nice! Talk about a happy accident!

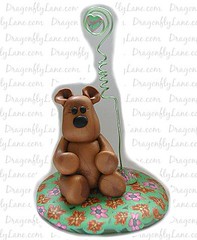
Now remember, I've been starting from scratch (as far as clay and supplies). My stash of canes is in storage. :( I was dying to try an idea I had in my mind. I envisioned the green background flower canes on a "grassy knoll"....and a cute little teddy bear sitting there. In my mind the knoll was covered with several different color flowers. But! Since I have no patience, I made it with the two canes I had. LOL!
It's a photo holder!
photoholder_bear5.06

Remember to click on the pictures for larger images. It will also take you to my Flickr where you can see more pictures of the raw canes.

Sunday, April 30, 2006

Broccoli Cheese Chicken by Jenn

Thanks to my in-laws, I have outside participation again. Yay! All you long time internet friends I thought would join in...
This week's recipe courtesy of my new SIL, Jennifer.
Her personal notes are in color.

makes 4 servings
Prep time: 5 min
Cook time: 25 min

1 tablespoon margarine or butter
4 skinless, boneless chicken breast halves (about 1 lb)
1 can (10 3/4 oz) Campbell's condensed Broccoli Cheese Soup
2 cups fresh broccoli flowerets (I use the frozen chopped)
1/3 cup water or milk
1/8 teaspoon pepper

In a 10-inch skillet over med-high heat, in hot margarine, cook chicken 10 min or until browned on both sides. Remove, set aside. (If you have a George Foreman Grill use that to cook the chicken. It makes it easier to cook and quicker to prepare, plus it guarantees the chicken is done - NO E COLI)

In same skillet, combine soup, broccoli, water and pepper. Heat to boiling. Return chicken to skillet. Reduce heat to low. Cover and cook 10 minutes or until chicken is no longer pink and broccoli is tender, stirring often.

Friday, April 28, 2006

1st "watercolor"

I met a wonderful, sweet lady (Hi Glori!) recently on Flickr. She creates beautiful things in polymer clay, and was kind enough to tell me how she makes her "watercolor" creations.

I had some leftover tinted translucent clay and decided to try the technique. My colors are too light, but it was the only scrap I had at the moment. The technique is so much fun! I can't wait to make more watercolor creations with brighter tinted clay!

(Oh! This is also the 1st items I've baked/sanded/buffed using Kato.) The heart was the 1st thing I made. It started as a big round bead, but I changed it to a fridge magnet. I worked it and stretched it too much. But that's ok! Live and learn. :) The rest are double-hole beads. Again not perfect, but I'll happily make a bracelet out of them someday. (When I get my jewelry supplies out of storage.)
1st watercolor

I remembered why I stopped making beads. The sanding and buffing sucks! LOL! I may be young in years, but I have arthritic hands of a woman twice my senior. I opted for beads b/c I needed things I could bake flat. I don't even have fluffy polyfil to bake things on. I came {this close} to performing surgery on one of my son's stuffed animals. LOL!

Anyway! The watercolor technique was simple and fun. I'm really looking forward to try it many more times. Thanks so much for sharing, Glori! HUGS!

Thursday, April 20, 2006

1st new canes in months

It's so nice to be making canes again. If I could figure out how not to require sleep, I could clay for several hours each day! LOL!

All of these are made w/Kato clay. A new brand for me. The first few blocks I purchased (at Michael's) were very hard. I was frustrated and my hands ached. But I decided to buy a few more blocks online and try again. They were completely different! Fresh and soft and wonderful to work with. Except for the horrible odor (I may be strange, but I enjoy Premo's smell), I'm growing to really love Kato clay. If you cane, and have not tried Kato...I highly recommend it! It reduces beautifully and quickly.

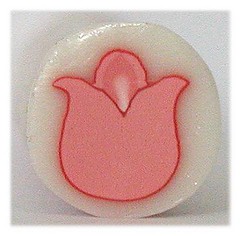
Ok, enough of my unpaid product endorsement. LOL! This tulip is the first thing I've made in months. As well as my first tulip cane. The middle petal is not as pointy as I'd like, but I'm still pleased. 1st tulip_reduced

I decided to try a dragonfly. Every color in the cane is a custom blend. Even the white is not 'white'. It's white, pearl, and translucent. Here are the bullseye canes I used for the wings. 1st dragonfly_canes used Each is slightly tinted translucent. You also see the 3-color skinner blend I used for the body segments. The blend is SO pretty. But the poor little dragonfly.....UGLY. LOL! I did not make good color choices, IMO. Perhaps when reduced, it will be smashing. But for now...UGLY.
1st dragonfly_built
I am very pleased with it's shape. For me, the first time making any new cane is experiment. Even though the colors are fugly, it LOOKS like a dragonfly. Yay! Oh! Something else I learned while building it....the wings. Before I reduced the wings, the "cells" were SO COOL! Unfortunately, now they are too small to appreciate the colors. I'll try to correct this next time.

Wednesday, April 19, 2006

Far far away clay

My newly aquainted clay friends do not know much about me. So here's a background story for you. Maybe I'm just the nosiest person ever...I don't know. But I really enjoy hearing the personal stories behind crafty creations and their creators.

My wonderful husband, Aaron, is in aviation. He repairs and modifies the skins of airplanes. Which means any part of a plane that is metal...he can change it, repair it, modify it, build a new part from scratch, install it...you name it! His job enables us to move a lot. We go where the good jobs are. (This is why I've been homeschooling our 1st grader.) The last job took us to Arkansas. We were *this close* to moving to a new location when my renter decided to vacate my house in Oklahoma.

Aaron and I both owned houses in Oklahoma prior to getting married. Both homes were rented until January, when my renter LEFT! We decided to remodel my house and sell it. We thought it would be a quick (2-3 months tops!) remodel. We opted to move into the house while remodeling. In the meantime Aaron would work in Oklahoma City (60 mile commute from my house) to pay the bills. Unfortunately, our "plans" have gone horribly wrong. Aaron is working 80 hours each week! 6 days a week! Plus commuting 2+ hours each day! He is NEVER HOME. I am trying to work on the house. Trying. But my job is 24/7/365....homeschooling and an 11-month-old baby AND being pregnant....leaves very little time for painting and that sort of labor.

Now let me back up. Because we were expecting to be here 2 months, we left 90% of our belongings in storage in Arkansas! We were planning to finish this house quickly, go back for our belongings, and move on to the next job. This means: my beloved clay and ALL my supplies are 300 miles away. Most likely curing and ruining in a HOT metal storage facility. The price of gasoline and renting a Uhaul truck and TIME!! is preventing us from retrieving our things from storage.

A few weeks ago we visited Michael's and I bought some clay and a crappy Amaco pasta machine. Just to get me by for now. I desperately needed my creative clay time. I get VERY little clay time, but very little is better than NONE! Everytime I use the pasta machine I curse it's name. However! It's better than no pasta machine.

I get to work on a cane for 20-30 minutes at a time. Before getting pulled away for various things. Consequently, it takes me days to finish one simple cane. But I will triumph!! I am determined! So far I've made a tulip (for the 1st time), 2 leaf canes, and I'm currently working on a dragonfly (for the 1st time). I hope to have pictures to share very soon.

Monday, April 17, 2006

Four layer cheesecake by Gwen

Woohoo! It only took 3 months, but Recipe Swap Sunday finally has outside participation! LOL! Thanks to my wonderful mother-in-law, Gwen for this recipe.

Crust:
½ C chopped pecans
1 C flour
¼ C melted butter (oleo)
Mix together until moist. Press into bottom of 7x11 pan. Bake at 350 for 15 minutes.

2nd Layer:
8 oz pkg of cream cheese
1 C Powdered Sugar
1 tsp Vanilla
Mix together until creamy. Spread over cooled crust.

3rd Layer:
4.6 oz box of Chocolate Pudding
3 C Milk
Mix according to package directions. (I prefer the taste of Cook & Serve Pudding, but Instant can be used also) When cool, spread over cream cheese layer.

Topping:
16 oz Cool Whip
Spread over top of pudding layer. Can top with sprinkles of Choc or anything pretty for decoration.

Can be varied:
Sometimes I slice bananas between the 2nd & 3rd layers and use Banana Cream or Vanilla Pudding. Just use your imagination!!

Sunday, April 16, 2006

Easy baked chicken

Boneless chicken parts - your choice
1 pkg. McCormick Grill Mates dry marinade mix - any flavor

Mix up the McCormick marinade according to package directions, in a small baking dish. Lay chicken pieces in marinade. Turn over once to coat both sides. Cover with aluminum foil and bake, 375 degrees until cooked thoroughly.

That's it!! Add instant rice and your family's favorite veggie. I've made this 2 ways: letting it marinate overnight AND instantly popping it into the oven. Both ways are delicious!

Tuesday, April 11, 2006

New polymer clay books

I recently bought these two new books.


They should arrive in 2 more days. I'm excited! It's been a long while since I've bought new eye candy/learning books. Plus all my books are in storage right now. All I have with me here is a couple issues of PolymerCafe. I'm jonesin' for new books!!

Sunday, April 09, 2006

Tomato Chicken Parmesan

2 eggs, beaten
1 cup grated parmesan cheese
7 oz seasoned bread crumbs
6 skinless, boneless chicken breast halves
1 Tbsp vegetable oil
12 oz pasta sauce
6 slices monterey jack cheese

Preheat oven to 375 degrees F.
Pour beaten eggs into shallow dish. In a seperate dish mix together the grated parmesan cheese and bread crumbs. Dip chicken into egg, then bread crumb mixture to coat thoroughly.
In large skillet, heat oil over medium-high heat. Add coated chicken and saute each side until chicken is cooked and juices run clear.
Pour pasta sauce into a lightly greased 9x13 baking dish. Add chicken, then place a cheese slice over each breast. Bake for 20 minutes or until cheese is completely melted.

- - - - - - - - - - - - - - -
Personal note: I did not have pasta sauce on hand, as we make our own. So I used one can of diced tomatoes, one small can of tomato paste, some garlic powder, parsley flakes, oregano, and salt and pepper. I blended it all really well in the food processor.
I also used a "fiesta blend" finely shredded cheese on top because I did not have the monterey jack slices.
Oh! And my bread crumbs were "italian flavor". Oh! And I used cheap boneless chicken thighs also. LOL!
The dish was delicious!!

Sunday, April 02, 2006

Simple Stroganoff

1-2 lbs hamburger
1 onion chopped
1-2 cans cream mushroom soup (depending on amount of hamburger used)
16 oz sour cream
1-2 tsp garlic
3-4 Tbsp parsley flakes
salt and pepper

Brown hamburger and onion. Drain grease.
Add remaining ingredients and simmer until thoroughly mixed and heated.

Serve over egg noodles.

Monday, March 27, 2006

Crock Pot (Slow Cooker) Pork Chops

~2 lbs. boneless pork chops
2 cans cream mushroom soup
1 pkg. McCormick's Zesty Herb dry marinade mix
3 Tbsp. vinegar
salt
pepper
garlic
chopped (dry) onion
splash of milk

Brown pork chops in a skillet in a little oil. Just until browned on both sides. Place chops in crock pot.

Mix 2 cans soup, marinade mix, vinegar, milk, and remainder of seasonings to taste. Pour mixture over chops. Cover and cook on low 8 hours.
The gravy is very good over rice.

Please forgive the 'generalness' of this recipe. I don't measure much when cooking. This recipe was an adaptation of another bland recipe. It feeds 2 adults, 1 child, with leftovers.

A day late

Middle of last week I discovered a delicious new recipe. I was so jazzed about it I almost shared it mid-week. But decided to wait until the designated Sunday. And, of course, we were busy all day yesterday and I never got online. Woops. :)
I'll be back later with the super easy recipe for the super yummy Crockpot (slow cooker) Pork Chops.

Saturday, March 18, 2006

Salmon Patties

1 Can Salmon (Remove bones and skin)
1 or 2 Eggs
2 teaspoons Baking Powder
1 teaspoon Salt
½ teaspoon Garlic
1 Cup flour

You can add onions if you’d like or if you get it too thick you can add a tablespoon or two of milk.

Heat oil in skillet – when hot, drop heaping tablespoons of mix into oil, dipping back of spoon into oil, rub on top of salmon patty to spread patty out to about ¼ inch thick, fry till light brown on one side turn and fry on the other side.

Sunday, March 05, 2006

No recipe today

My MIL is here visiting. No recipe from me today.

Not like anyone is here anxiously awaiting to swap recipes anyway! I'll be back next week.

Friday, March 03, 2006

Testing something

I'm testing something from my business domain. Nevermind me...I'm just piddling. :)