Wednesday, June 21, 2006

Mica shift magnets

I've only tried mica shift once before. The results were not impressive. Totally my fault for skimming directions. That was well over a year ago.

Last week I got the wild hair to try again. I have Kato clay now and have read many times how wonderful Kato is for mica shift. I mixed up a pale blue color and got out one of my favorite swirly stamps. I loved it instantly! I kept making my husband rub his fingers over the raw clay...."Feel how smooth it is?!? How cool is that?!?" LOL!

The next day I sat down to play. NO prior plans or expectations. I was merely 'piddling'. I got out the wavey blade. I trimmed the blue sheet a bit. Then I decided to put a black & white border around it....contrasting the pastel blue....it might look cool. (I just love the funky striped border effect!) Then I envisioned beaded dangles from the wavey edge. And it clicked: magnets!!

So I started mixing coordinating pastel colors. I suddenly had a plan. *insert evil giggle* A whole set of bejewelled, shiny, funky fridge magnets. Ooooh yeah!!

This is what I got.
Mica shift beaded magnets
(click for bigger pic)
I call it jewelry for the fridge. I love love love the way they look on the fridge. I will definately be making more fridge jewelry in the future!

Sunday, June 04, 2006

Clay on canvas

I had an idea for a wall hanging for my daughter's room. I painted a canvas pink, added glitter, and then created clay flowers and a dragonfly. I really like the way it turned out.

Clay on canvas

It still needs something. I can't decide what. Originally I planned on a black & white stripe clay border....along the outer edge. I've sinced changed my mind. I may paint some white clouds. I also thought about a swirly stamp along the edges. But I just can't decide.

This was my "prototype". I have several ideas for similar wall hangings. I love building flower canes, but hate having to choose a color for the outer/negative space. This canvas idea is great for me. I can make oodles of petal canes and not have to commit to background color. Plus I like the 3D look. They don't have to be flat like cane slices.

Oh...the dragonfly! Was my first TLS experiment. What FUN that stuff is!! I bought a bunch of pre-colored TLS from a fellow clayer. I've been playing around with the colors making sets of wings. Fun fun fun!!

Now I need to hit the craft store for more canvas. Wheeeee!!

Thursday, May 04, 2006

Flowers and a bear

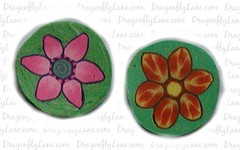
Here are 2 new flower canes I've made:
Flower canes April 06_reduced
The pink flower came first. It's my favorite! I love how it turned out. From start to finish it just worked. :)
The orange flower went thru several incarnations during the building process. I started w/the idea of a simple sunflower-esque cane. But I did not really like the colors after I built the petal cane. So I tried reducing it and changing the look. I had to make the petals really small. I didn't start with a large enough skinner blend....a problem when changing plans. Long story short: I was unhappy with it from the start. It seemed to get uglier with each incarnation! LOL! But I finished it and reduced it. I was shocked when I cut into the cane. It turned out quite nice! Talk about a happy accident!

Now remember, I've been starting from scratch (as far as clay and supplies). My stash of canes is in storage. :( I was dying to try an idea I had in my mind. I envisioned the green background flower canes on a "grassy knoll"....and a cute little teddy bear sitting there. In my mind the knoll was covered with several different color flowers. But! Since I have no patience, I made it with the two canes I had. LOL!
It's a photo holder!
photoholder_bear5.06

Remember to click on the pictures for larger images. It will also take you to my Flickr where you can see more pictures of the raw canes.

Sunday, April 30, 2006

Broccoli Cheese Chicken by Jenn

Thanks to my in-laws, I have outside participation again. Yay! All you long time internet friends I thought would join in...
This week's recipe courtesy of my new SIL, Jennifer.
Her personal notes are in color.

makes 4 servings
Prep time: 5 min
Cook time: 25 min

1 tablespoon margarine or butter
4 skinless, boneless chicken breast halves (about 1 lb)
1 can (10 3/4 oz) Campbell's condensed Broccoli Cheese Soup
2 cups fresh broccoli flowerets (I use the frozen chopped)
1/3 cup water or milk
1/8 teaspoon pepper

In a 10-inch skillet over med-high heat, in hot margarine, cook chicken 10 min or until browned on both sides. Remove, set aside. (If you have a George Foreman Grill use that to cook the chicken. It makes it easier to cook and quicker to prepare, plus it guarantees the chicken is done - NO E COLI)

In same skillet, combine soup, broccoli, water and pepper. Heat to boiling. Return chicken to skillet. Reduce heat to low. Cover and cook 10 minutes or until chicken is no longer pink and broccoli is tender, stirring often.

Friday, April 28, 2006

1st "watercolor"

I met a wonderful, sweet lady (Hi Glori!) recently on Flickr. She creates beautiful things in polymer clay, and was kind enough to tell me how she makes her "watercolor" creations.

I had some leftover tinted translucent clay and decided to try the technique. My colors are too light, but it was the only scrap I had at the moment. The technique is so much fun! I can't wait to make more watercolor creations with brighter tinted clay!

(Oh! This is also the 1st items I've baked/sanded/buffed using Kato.) The heart was the 1st thing I made. It started as a big round bead, but I changed it to a fridge magnet. I worked it and stretched it too much. But that's ok! Live and learn. :) The rest are double-hole beads. Again not perfect, but I'll happily make a bracelet out of them someday. (When I get my jewelry supplies out of storage.)
1st watercolor

I remembered why I stopped making beads. The sanding and buffing sucks! LOL! I may be young in years, but I have arthritic hands of a woman twice my senior. I opted for beads b/c I needed things I could bake flat. I don't even have fluffy polyfil to bake things on. I came {this close} to performing surgery on one of my son's stuffed animals. LOL!

Anyway! The watercolor technique was simple and fun. I'm really looking forward to try it many more times. Thanks so much for sharing, Glori! HUGS!

Thursday, April 20, 2006

1st new canes in months

It's so nice to be making canes again. If I could figure out how not to require sleep, I could clay for several hours each day! LOL!

All of these are made w/Kato clay. A new brand for me. The first few blocks I purchased (at Michael's) were very hard. I was frustrated and my hands ached. But I decided to buy a few more blocks online and try again. They were completely different! Fresh and soft and wonderful to work with. Except for the horrible odor (I may be strange, but I enjoy Premo's smell), I'm growing to really love Kato clay. If you cane, and have not tried Kato...I highly recommend it! It reduces beautifully and quickly.

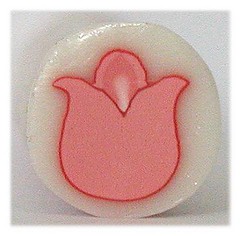
Ok, enough of my unpaid product endorsement. LOL! This tulip is the first thing I've made in months. As well as my first tulip cane. The middle petal is not as pointy as I'd like, but I'm still pleased. 1st tulip_reduced

I decided to try a dragonfly. Every color in the cane is a custom blend. Even the white is not 'white'. It's white, pearl, and translucent. Here are the bullseye canes I used for the wings. 1st dragonfly_canes used Each is slightly tinted translucent. You also see the 3-color skinner blend I used for the body segments. The blend is SO pretty. But the poor little dragonfly.....UGLY. LOL! I did not make good color choices, IMO. Perhaps when reduced, it will be smashing. But for now...UGLY.
1st dragonfly_built
I am very pleased with it's shape. For me, the first time making any new cane is experiment. Even though the colors are fugly, it LOOKS like a dragonfly. Yay! Oh! Something else I learned while building it....the wings. Before I reduced the wings, the "cells" were SO COOL! Unfortunately, now they are too small to appreciate the colors. I'll try to correct this next time.

Wednesday, April 19, 2006

Far far away clay

My newly aquainted clay friends do not know much about me. So here's a background story for you. Maybe I'm just the nosiest person ever...I don't know. But I really enjoy hearing the personal stories behind crafty creations and their creators.

My wonderful husband, Aaron, is in aviation. He repairs and modifies the skins of airplanes. Which means any part of a plane that is metal...he can change it, repair it, modify it, build a new part from scratch, install it...you name it! His job enables us to move a lot. We go where the good jobs are. (This is why I've been homeschooling our 1st grader.) The last job took us to Arkansas. We were *this close* to moving to a new location when my renter decided to vacate my house in Oklahoma.

Aaron and I both owned houses in Oklahoma prior to getting married. Both homes were rented until January, when my renter LEFT! We decided to remodel my house and sell it. We thought it would be a quick (2-3 months tops!) remodel. We opted to move into the house while remodeling. In the meantime Aaron would work in Oklahoma City (60 mile commute from my house) to pay the bills. Unfortunately, our "plans" have gone horribly wrong. Aaron is working 80 hours each week! 6 days a week! Plus commuting 2+ hours each day! He is NEVER HOME. I am trying to work on the house. Trying. But my job is 24/7/365....homeschooling and an 11-month-old baby AND being pregnant....leaves very little time for painting and that sort of labor.

Now let me back up. Because we were expecting to be here 2 months, we left 90% of our belongings in storage in Arkansas! We were planning to finish this house quickly, go back for our belongings, and move on to the next job. This means: my beloved clay and ALL my supplies are 300 miles away. Most likely curing and ruining in a HOT metal storage facility. The price of gasoline and renting a Uhaul truck and TIME!! is preventing us from retrieving our things from storage.

A few weeks ago we visited Michael's and I bought some clay and a crappy Amaco pasta machine. Just to get me by for now. I desperately needed my creative clay time. I get VERY little clay time, but very little is better than NONE! Everytime I use the pasta machine I curse it's name. However! It's better than no pasta machine.

I get to work on a cane for 20-30 minutes at a time. Before getting pulled away for various things. Consequently, it takes me days to finish one simple cane. But I will triumph!! I am determined! So far I've made a tulip (for the 1st time), 2 leaf canes, and I'm currently working on a dragonfly (for the 1st time). I hope to have pictures to share very soon.

Monday, April 17, 2006

Four layer cheesecake by Gwen

Woohoo! It only took 3 months, but Recipe Swap Sunday finally has outside participation! LOL! Thanks to my wonderful mother-in-law, Gwen for this recipe.

Crust:
½ C chopped pecans
1 C flour
¼ C melted butter (oleo)
Mix together until moist. Press into bottom of 7x11 pan. Bake at 350 for 15 minutes.

2nd Layer:
8 oz pkg of cream cheese
1 C Powdered Sugar
1 tsp Vanilla
Mix together until creamy. Spread over cooled crust.

3rd Layer:
4.6 oz box of Chocolate Pudding
3 C Milk
Mix according to package directions. (I prefer the taste of Cook & Serve Pudding, but Instant can be used also) When cool, spread over cream cheese layer.

Topping:
16 oz Cool Whip
Spread over top of pudding layer. Can top with sprinkles of Choc or anything pretty for decoration.

Can be varied:
Sometimes I slice bananas between the 2nd & 3rd layers and use Banana Cream or Vanilla Pudding. Just use your imagination!!

Sunday, April 16, 2006

Easy baked chicken

Boneless chicken parts - your choice
1 pkg. McCormick Grill Mates dry marinade mix - any flavor

Mix up the McCormick marinade according to package directions, in a small baking dish. Lay chicken pieces in marinade. Turn over once to coat both sides. Cover with aluminum foil and bake, 375 degrees until cooked thoroughly.

That's it!! Add instant rice and your family's favorite veggie. I've made this 2 ways: letting it marinate overnight AND instantly popping it into the oven. Both ways are delicious!

Tuesday, April 11, 2006

New polymer clay books

I recently bought these two new books.


They should arrive in 2 more days. I'm excited! It's been a long while since I've bought new eye candy/learning books. Plus all my books are in storage right now. All I have with me here is a couple issues of PolymerCafe. I'm jonesin' for new books!!

Sunday, April 09, 2006

Tomato Chicken Parmesan

2 eggs, beaten
1 cup grated parmesan cheese
7 oz seasoned bread crumbs
6 skinless, boneless chicken breast halves
1 Tbsp vegetable oil
12 oz pasta sauce
6 slices monterey jack cheese

Preheat oven to 375 degrees F.
Pour beaten eggs into shallow dish. In a seperate dish mix together the grated parmesan cheese and bread crumbs. Dip chicken into egg, then bread crumb mixture to coat thoroughly.
In large skillet, heat oil over medium-high heat. Add coated chicken and saute each side until chicken is cooked and juices run clear.
Pour pasta sauce into a lightly greased 9x13 baking dish. Add chicken, then place a cheese slice over each breast. Bake for 20 minutes or until cheese is completely melted.

- - - - - - - - - - - - - - -
Personal note: I did not have pasta sauce on hand, as we make our own. So I used one can of diced tomatoes, one small can of tomato paste, some garlic powder, parsley flakes, oregano, and salt and pepper. I blended it all really well in the food processor.
I also used a "fiesta blend" finely shredded cheese on top because I did not have the monterey jack slices.
Oh! And my bread crumbs were "italian flavor". Oh! And I used cheap boneless chicken thighs also. LOL!
The dish was delicious!!

Sunday, April 02, 2006

Simple Stroganoff

1-2 lbs hamburger
1 onion chopped
1-2 cans cream mushroom soup (depending on amount of hamburger used)
16 oz sour cream
1-2 tsp garlic
3-4 Tbsp parsley flakes
salt and pepper

Brown hamburger and onion. Drain grease.
Add remaining ingredients and simmer until thoroughly mixed and heated.

Serve over egg noodles.

Monday, March 27, 2006

Crock Pot (Slow Cooker) Pork Chops

~2 lbs. boneless pork chops
2 cans cream mushroom soup
1 pkg. McCormick's Zesty Herb dry marinade mix
3 Tbsp. vinegar
salt
pepper
garlic
chopped (dry) onion
splash of milk

Brown pork chops in a skillet in a little oil. Just until browned on both sides. Place chops in crock pot.

Mix 2 cans soup, marinade mix, vinegar, milk, and remainder of seasonings to taste. Pour mixture over chops. Cover and cook on low 8 hours.
The gravy is very good over rice.

Please forgive the 'generalness' of this recipe. I don't measure much when cooking. This recipe was an adaptation of another bland recipe. It feeds 2 adults, 1 child, with leftovers.

A day late

Middle of last week I discovered a delicious new recipe. I was so jazzed about it I almost shared it mid-week. But decided to wait until the designated Sunday. And, of course, we were busy all day yesterday and I never got online. Woops. :)
I'll be back later with the super easy recipe for the super yummy Crockpot (slow cooker) Pork Chops.

Saturday, March 18, 2006

Salmon Patties

1 Can Salmon (Remove bones and skin)
1 or 2 Eggs
2 teaspoons Baking Powder
1 teaspoon Salt
½ teaspoon Garlic
1 Cup flour

You can add onions if you’d like or if you get it too thick you can add a tablespoon or two of milk.

Heat oil in skillet – when hot, drop heaping tablespoons of mix into oil, dipping back of spoon into oil, rub on top of salmon patty to spread patty out to about ¼ inch thick, fry till light brown on one side turn and fry on the other side.

Sunday, March 05, 2006

No recipe today

My MIL is here visiting. No recipe from me today.

Not like anyone is here anxiously awaiting to swap recipes anyway! I'll be back next week.

Friday, March 03, 2006

Testing something

I'm testing something from my business domain. Nevermind me...I'm just piddling. :)

Sunday, February 26, 2006

Swiss Steak

1 onion
1 bell pepper
Beef cube steak
Large can diced tomatoes (plain or use your favorite flavored variety)

(I prepare this meal in an electric skillet.)

Chop onion and bell pepper, set aside.

Salt and pepper desired amount of beef cube steak. Flour and brown in a few tablespoons of hot grease. Do not cook until done. Remove from skillet and set aside.

Remove all but 1 Tblsp. of grease (approx.). Just enough grease to saute onion and bell pepper until tender.
Add steak back into skillet.
Pour can tomatoes over everything. Reduce heat to low/simmer setting, cover, cook for 20 minutes. Turning steaks once or twice. (Gently...they tend to be so tender they fall apart.)

Sunday, February 19, 2006

Enchilada Casserole

1 lb hamburger
1 onion chopped
8 oz cheddar cheese grated (I prefer shredded Mexican blend in the bag)
1 can mild enchilada sauce
1 can cream mushroom soup
corn tortillas

Brown hamburger and onion. Drain.
Add chilies, sauce, soup. Heat til bubbly. Set aside.
Layer in 8x8 baking dish:
~meat sauce
~tortillas
~cheese
Repeat until everything has been used. I only have enough for 2 layers of each. (But I also use a 9x13 dish.)
Bake at 375 until cheese is melted and dish is bubbly. Remove and let set for 15 minutes.

This recipe can easily be spiced up to suit hotter taste buds.

Tuesday, February 14, 2006

Recipe from February 13, 2006

This week I'm sharing a homemade spaghetti sauce recipe. It is super easy and soooo good. This recipe makes enough for us to have spaghetti the first nite, and use the rest for a lasagna the next.

Spaghetti Sauce

1-2 lbs hamburger, browned and drained
1 12oz can tomato paste
3 16oz cans tomato sauce
5 Tbsp parsley
5 tsp basil
2 tsp garlic powder
2 tsp oregano
2 Tbsp onion flakes
2 tsp salt
1/3 cup sugar

Simmer ingredients together in large pot for 15 minutes.

Recipe from February 05, 2006

Easy Chicken Alfredo

4 boneless skinless chicken breasts
Salt and pepper chicken. Flour and brown in about 4 Tblsp of oil. When they are golden brown, place in a baking dish.

3 cloves fresh garlic, chopped very fine
1 Tblsp finely chopped onion
After you remove chicken from skillet, saute garlic and onion for about 2 minutes on med-high heat.

Add to the sauteed stuff:
1 1/2 cups whipping cream
1/3 cup parmesian cheese
1/2 tsp coarse black pepper

Stir this mixture like gravy, until it starts to thicken a bit. Pour mixture over chicken.

Place in 350 preheated oven. Bake for 15 minutes or until chicken is cooked thoroughly.

(I serve mine with egg noodles and a veggie. Very yummy!)

Monday, February 13, 2006

OMG

I have come full circle. I wish I still had my first blogger blog. That was...probably 6 years ago I guess. It would make for interesting reading! Boy...6 years ago. And here I am again. Hmph!

I decided to start this blog as a nice home for Recipe Swap Sunday. In time it might evolve into more diverse content. For example...my craft obsessions. :) But for now I'm thinking it will be recipes. I'll move the xanga posts over here later.

I still want to make a list of recipe swappers in the sidebar. To make for easy surfing and swapping. So please leave a comment w/your URL if you'd like to be listed. Thanks!